Rapid Response: The Squirrelwaffle Incident Guide
Credit to Author: Tilly Travers| Date: Tue, 15 Feb 2022 13:00:10 +0000
This article is part of a series of step-by-step Incident Guides created by the Sophos Rapid Response team to help incident responders and security operations teams identify and remediate widely seen threat tools, techniques, and behaviors.
What is Squirrelwaffle and how does it attack?
Squirrelwaffle is a malware loader that is distributed as a malicious Office document in spam campaigns. It provides attackers with an initial foothold in a victim’s environment and a channel to deliver and infect systems with other malware. When a recipient opens a Squirrelwaffle-infected document and enables macros, a visual basic script typically downloads and executes malicious files and scripts, giving further control of the computer to an attacker.
Squirrelwaffle operators also use DocuSign to try and trick the user into enabling macros in Office documents.
Squirrelwaffle attacks typically result in spam emails being sent to the internal and external contacts of the victims’ employees for further spreading of the malware. On many occasions other malware such as Qakbot (Qbot) and cracked versions of Cobalt Strike are also installed, which can lead to more severe attacks such as ransomware.
A Squirrelwaffle attack is performed as a result of a Microsoft Exchange server having been compromised, typically through exploitation of the ProxyShell vulnerabilities.
Because of the way access to the Microsoft Exchange backend is set up, the tactics seen in Squirrelwaffle campaigns to date do not seem to guarantee detectable modifications to client users and roles. However, the access does allow external threats to extract and reply to email messages with crafted simple object access protocol (SOAP) requests towards exchange web services (EWS).
In some cases, we see “ApplicationImpersonation” roles being added to maliciously created mailboxes, while others appear to be operating solely through EWS via server-side request forgery (SSRF) attacks.
Incident Guide Context
This guide only addresses the investigation and mitigation of incidents involving Squirrelwaffle detected on the network. If additional internal lateral movement is detected as a result of unmitigated web shells or other exploitation of the ProxyLogon or ProxyShell vulnerabilities, we recommend a full Incident Response action.
In addition, the guide uses features of Sophos XDR, such as “Live Discover” and “Live Response” to illustrate the steps defenders can take. Security professionals that are not using Sophos XDR but have access to other tools such as OSQuery can adapt and apply the information to their needs.
The queries and commands referenced in the guide are some of the methods used by the Sophos Rapid Response team during incident engagements. They are recommendations only, there will be other ways of accomplishing each task.
Any PowerShell or command line instructions to remove items should be double checked to prevent the accidental removal of legitimate client configurations.
Investigate
The goal of this section is to establish if there are Indicators of Compromise (IOCs) related to ProxyShell or Squirrelwaffle.
Check Exchange version
First, we need to identify if there are any currently exploitable Microsoft Exchange servers on the network. To do this we need to confirm the version and patch level of every Exchange server.
Sophos XDR customers can create and run new Live Discover queries, if you are new to Live Discover and not sure how to do this, we recommend you look at the help guide first: Live Discover
- First login to Sophos Central, then go to: Threat Analysis Center > Live Discover
- Enable “Designer Mode”
- Select “Create new query”
- Give your query a name, description, select a category to store it and make sure to select “Live Endpoint”
- Copy the SQL details from the Rapid Response Github page:
- Save the query
You can now choose to run this query on you whole network or just your Exchange servers. The results will give you the version number for any online Exchange servers. These can then be verified for how old they are, here.
For further information on which versions are vulnerable please see: ProxyShell vulnerabilities in Microsoft Exchange: What to do
Look for previous exploitation
Patching Exchange will protect it from any further attempts to exploit ProxyShell. However, if it has already been exploited, malware may still exist on the server and provide an attacker with remote access. The next step is to look for signs of previous exploitation of Exchange.
Method 1 – Malware events
Review any recent malware detections.
Sophos XDR customers can take the following steps:
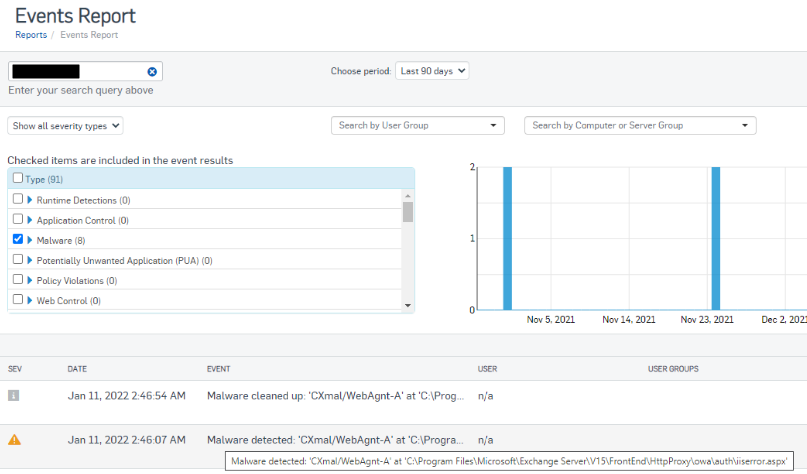
- While logged into Sophos Central go to: Logs & Reports > Events
- In the search box enter the name of any Exchange server
- Select the last 90 days from the drop down
- Deselect all the checked items except for “Malware”
- Click “Update”
- Review the names and locations of any detections listed
The list of detections for web shells as well as other threats is constantly changing. If in any doubt about what has been detected, please seek further assistance from the Community Forum.
If you believe you need urgent assistance, please look at the Rapid Response Service.
Example web shell detections:
- Malware detected: ‘CXmal/WebAgnt-A’ at ‘C:inetpubwwwrootaspnet_clientqgifbeskzqoybayx.aspx’
- Malware detected: ‘Troj/ASPDoor-Y’ at ‘C:inetpubwwwrootaspnet_clientqjocyhdfmrmmlycf.aspx’
- Malware detected: ‘Mal/Chopper-A’ at ‘C:WindowsMicrosoft.NETFramework64v4.0.30319Temporary ASP.NET Filesroote22c255992c7e946App_Web_web5oiz2.dll’
The most common locations related to Exchange exploitation where web shells may exist are these folders and their sub-directories:
- C:inetpubwwwrootaspnet_client
- C:Program FilesMicrosoftExchange ServerV15FrontEndHttpProxy
- C:ProgramData
- C:WindowsMicrosoft.NETFramework64
Method 2 – Review Exchange logs
Another method of doing this is to look at the ‘MSExchange Management’ Windows Event log.
Create the query located at the link below, using the same method described above:
Run this query on the Exchange servers and investigate the results. One event that you should look for first is “New-MailboxExportRequest.” Suspicious cases will often have a random subject name and point to an “.aspx” file. Those .aspx files are the web shell.

There may be other reasons for these events and files to exist, so always investigate and verify before taking further actions. If you see similar results to these, there is a high probability the Exchange server was exploited.
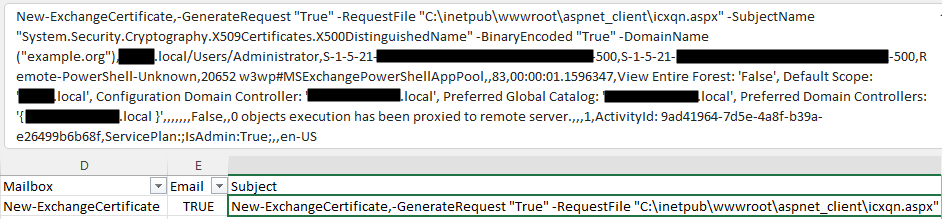
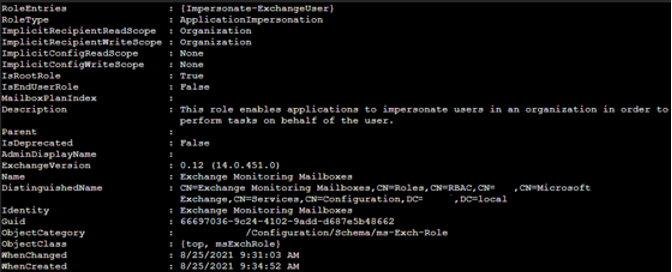
Using the same data, you should look for “New-ExchangeCertificate” results. The creation of management roles and new mailboxes for application impersonation is part of the Squirrelwaffle attack chain. You will likely see a reference to an “.aspx” and the username of the account being changed.
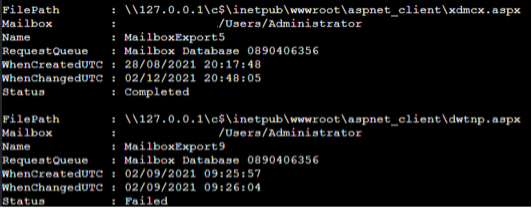
Another event you might see may look like this:
![]()
![]()
This indicates that the entire mailbox for that user (.pst file) has been exported. In this example it is the mailbox of the administrator, but it could be any user. This activity could be completely legitimate and done by one of your administrators or backup software. If an attacker was behind this, it would give them read-only access to the user’s emails. This can provide valuable information about the victim organization for later phishing emails.
You may also see this:
![]()
![]()
This is the ‘Import Export’ role being assigned to the account.
Method 3 – Malicious HealthMailbox
HealthMailbox accounts are a legitimate part of how Microsoft Exchange works, and it is normal to see these in your Active Directory. However, part of the ProxyShell vulnerability involves creating new HealthMailboxes and identifying these is critical as you will need to manually remove them or risk an attacker maintaining their network access.
The best way to detect HealthMailboxes is through Active Directory (AD). Legitimate HealthMailboxes are placed in CN=Monitoring Mailboxes,CN=Microsoft Exchange System Objects. If any Healthmailboxes are present in other OU’s or Active Directory groupings, they are suspicious and should be verified.
From a Domain Controller using PowerShell run the following command:
- get-aduser -Filter “Name -like ‘*HealthMailbox*’” -Properties created | where {$_.DistinguishedName -notlike ‘*Monitoring*’} | fl
The command will query AD for any users that are similar to HealthMailbox and do not have “Monitoring” in their DistinguishedName. If any accounts come back, those are suspicious and likely malicious.
If you do not have access to Active Directory, there are a couple of less full proof ways to hunt for these accounts.
The first requires the command that created the account. This would be present in the MSExchange Management event logs in the form of a “New-Mailbox” cmdlet being issued. Legitimate HealthMailboxes are created automatically by the system and would not have a command being issued or tracked in these logs. Keep in mind that, depending on how much time has passed, the log may have overwritten the event. This information can be acquired through direct PowerShell or Live Discover.
PowerShell Example:
Get-WinEvent -LogName ‘MSExchange Management’ | where {$_.Message -like ‘*New-Mailbox,*’ -and $_.Message -like ‘*HealthMailbox*’} | fl
Live Discover:

The second option is much less reliable and relies on the name of the HealthMailbox and using the Logon_Session table in OSQuery. With how Windows and Active Directory handles accounts, there are multiple different aspects to an account that can define a Name. The ones we are using here are broken up between Active Directory and Local Account information.
Active Directory accounts can make use of DistinguishedName (DN), SAMAccountName (SAM), and UserPrincipleName (UPN). The order of accuracy is DN, UPN, and then SAM. As mentioned earlier, the DN will show the full name and how the account is organized in AD. The UPN will show the full name without the grouping, which can be paired with the Logon_Session table in OSQuery to find suspicious HealthMailboxes.
The thing to keep in mind is that both malicious and legitimate HealthMailboxes can perform login actions that may or may not get logged to this table, depending on how long the Sophos agent has been present.
If the events have been logged, legitimate HealthMailboxes include a 32-character string at the end of their name. Malicious HealthMailboxes have only been seen with a 7-character string. Any logon events that show a UPN field (not username) that is the short version should be further investigated. This information can be gathered through Live Discover:

Analyze
If you have seen IOCs related to Exchange being exploited, this section will look at identifying if any web shells still exist, as well as some methods to further investigate the attackers’ actions.
Locating potential web shells
By this point you may have already seen the names and folder paths of web shells that were previously created on your Exchange server.
If you now create and run this query:
This will look for .aspx files in the most common locations we would expect to see them on an exploited Exchange server.
Please note that if you find a .aspx file, this does not guarantee it is a web shell. If you want to verify this, we recommend emailing a copy of the file to samples@Sophos.com. There will likely be legitimate .aspx files on Exchange servers.
It is also important to understand that if attackers gained access to the server previously, they may have created other web shells or further means of accessing the server in the event that the original web shells get detected or the server is patched.
Identifying unauthorized Export Requests, Management Roles and Application Impersonation
Part of this attack involves changing permissions of accounts. This activity needs to be identified and corrected or it can allow previously removed web shells to be recreated.
On the Exchange server start a PowerShell session and run this command:
- Add-PSSnapin Microsoft.Exchange.Management.PowerShell.SnapIn
Next, show the Mailbox Export Request queue:
- Get-MailboxExportRequest | Select-Object -Property FilePath,Mailbox,Name,RequestQueue,WhenCreatedUTC,WhenChangedUTC,Status
Next, show the Management Roles using “ApplicationImpersonation”:
- Get-ManagementRoleAssignment -Role “ApplicationImpersonation” | Select-Object -Property Name,Role,RoleAssigneeName,WhenCreated
And finally, Management Roles using “Mailbox Import Export”:
- Get-ManagementRoleAssignment -Role “Mailbox Import Export” | Select-Object -Property Name,Role,RoleAssigneeName,WhenCreated

The results show the Mailbox Export requests still in the queue, as well as lingering unauthorized Import Export roles, which can allow previously removed web shells from ProxyShell and ProxyLogon exploitation to be recreated.
Unauthorized Application Impersonation roles are attributed to Squirrelwaffle activity that allows new accounts to act on another user’s behalf.
Looking for suspicious commands
IIS Logs
If an attacker gained the ability to execute commands remotely on the server, one of the first places these might show up is in the Internet Information Services (IIS) logs. You can identify the location and name of these logs by using this query:
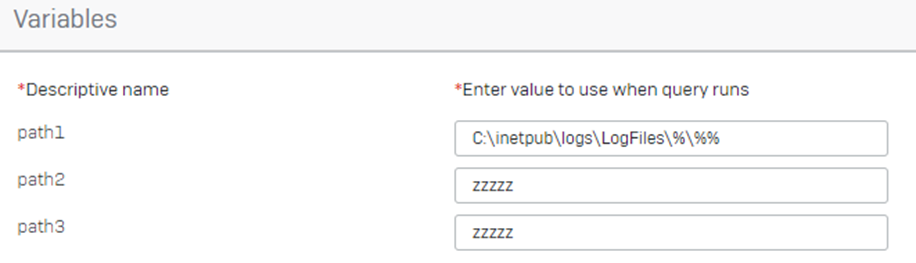
This query supports three path variables, you will likely just want to use ‘path1’ and enter the value:
- C:inetpublogsLogFiles%%%
For any variables you aren’t using, just enter a value that will not return a result. For example:
You will likely get a result like this:

You can then use the below query to Grep the contents of these log files. Grep gives us the ability to search log files remotely for strings of text and bring back any rows in the log that have a match.
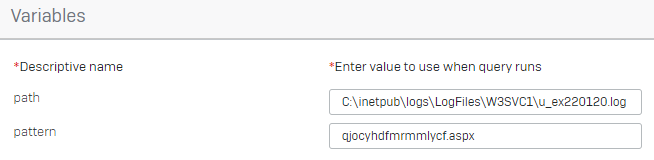
The best method here is to search for any of the .aspx filenames you identified earlier in your investigation.
For example:
If you don’t get any results, make sure you check the other log files and other .aspx file names you have seen. If you do get results, they may look similar to the below and while they can be read by humans, this may be difficult at first glance.

If you export this data to a CSV and then copy the ‘line’ column, you can use sites like CyberChef to help make this easier to read.
This CyberChef recipe will help you: https://gchq.github.io/CyberChef/#recipe=URL_Decode()Find_/_Replace(%7B’option’:’Regex’,’string’:’%5E’%7D,’%5C%5Cn’,true,false,true,false)Syntax_highlighter(‘auto%20detect’)
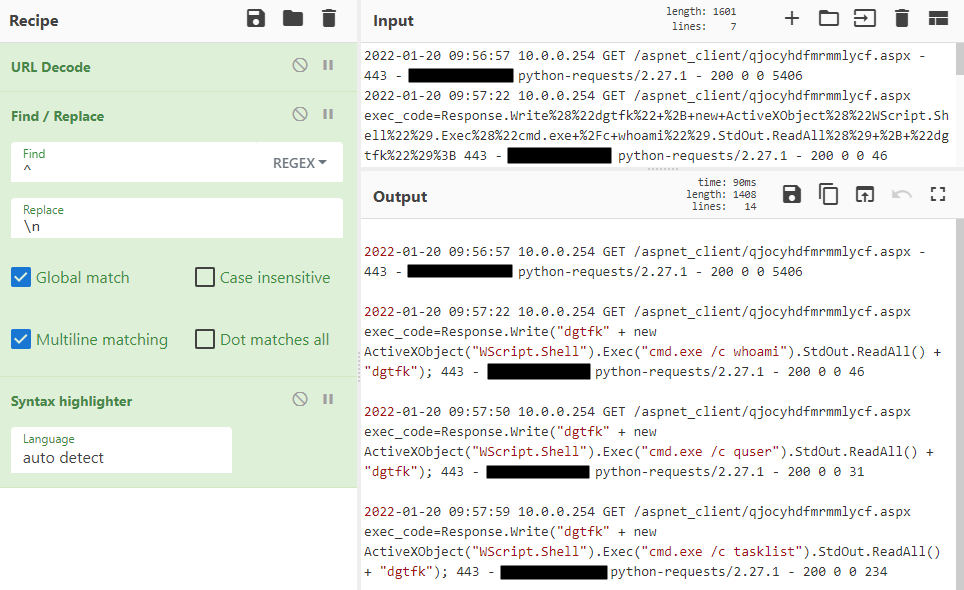
In this example, we see the commands:
- Whoami
- Quser
- Tasklist
These are common discovery commands attackers may use to collect more information about the access they have.
PowerShell Logs
Another common feature of ProxyShell and Squirrelwaffle attacks is the use of Microsoft PowerShell to execute commands. Reviewing these logs is not a simple task, due to the amount of PowerShell likely being executed for legitimate use on the Exchange server.
This query will retrieve information from the PowerShell logs and attempt to identify potentially suspicious commands:
NOTE: Most PowerShell commands you find will likely be legitimate, including ones marked as suspicious (sus). You will need to manually review these, and prior knowledge of PowerShell will be needed.
In the below example we can see PowerShell being used to disable Windows Defender’s real time monitoring protection.

Respond
Patch
The first thing to do is to verify that Exchange servers have the very latest patches installed. A list of versions and the date they were published by Microsoft can be found here:
Remove malicious HealthMailboxes
The next step is to remove unauthorized HealthMailboxes or other suspicious mailboxes that were created during the incident, as determined during the Hunt stage (see “Hunt” above).
It is best if the victim organization removes such mailboxes themselves, so they have full visibility. The unauthorised mailboxes should be deleted to also remove the admin domain account. Disabling the mailbox only will retain the AD account.
To do this is straight forward; on the Exchange server, open PowerShell and run this command:
- Add-PSSnapin Microsoft.Exchange.Management.PowerShell.SnapIn
This adds Exchange cmdlets to the current PowerShell session. Then run this command:
- Remove-Mailbox -Identity “<Name of malicious Healthmailbox>” -Permanent $true
This removes the mailbox and the AD user account completely.
The “-Permanent $true” is optional, but if you run without it the mailbox will just be disconnected and remain in the mailbox database for 30 days (or whatever they have the retention period set to.) You can also do this through the Exchange GUI, but you need to make sure you select “Delete” and not just “Disable” for the mailbox.
Remove MailboxExportRequests
After that, you need to remove MailboxExportRequests still in the queue that are not legitimate, and which were identified during the Investigate stage. If possible, also remove old “Completed” and “Failed” requests that are still in the history.
Third party incident responders should ideally ask the victim to remove these requests, so they have full visibility. The requests can be removed from PowerShell if needed.
Remove all requests with a “Completed” Status:
- Get-MailboxExportRequest -Status Completed | Remove-MailboxExportRequest
Remove all requests with a “Failed” Status:
- Get-MailboxExportRequest -Status Failed | Remove-MailboxExportRequest
Remove requests for a single identity:
- Remove-MailboxExportRequest -Identity “<Request Identity>”
NOTE: “-Confirm:$false” can be included at the end of each command to bypass confirmation to delete. Verify that you are removing what you intend to before using this.
Remove Unauthorized Management Roles
Unauthorized management roles that were identified during the investigation need to be removed.
(Exchange includes built in role assignments that use these roles. You need to verify a created role before suggesting its removal).
Third party incident responders should ideally ask the victim to remove these roles, so they have full visibility. The roles can be removed from PowerShell if needed.
Remove single management role:
- Remove-ManagmentRoleAssignment “<ROLE NAME>”
NOTE: “-Confirm:$false” can be included at the end of each command to bypass confirmation to delete. Verify you are removing what you intend to before using this.
At this point we recommend that all user passwords are reset as a precaution (the attack chain does not show signs of account compromise unless additional events are found.) This is partially because recipients of Squirrelwaffle emails may be targeted in the future with spear-phishing attacks based on content extracted through EWS.
If further activity related to Squirrelwaffle or Exchange vulnerabilities and web shells is seen, we recommend you investigate and, if necessary, seek 3rd party Incident Response assistance.
Sophos would like to acknowledge Matthew Everts, Stephen McNally and Vikas Singh from the Sophos Rapid Response Team for their contributions to this report.